Saturday, 18 June 2011

"That's Amore!" Pasta e fagioli ( original Italian Pasta and Beans recipe)


You knew it was Tuesday or Friday when you came home from school and you could smell fagioli (haricot beans) ceci (chick peas) or lenticchie (green lentils.) "BORING!" I would say... no longer... even the smell of one of these dishes has the power to fill me with a kind of nostalgia, a longing for those Winter afternoons when the house was warm, the windows were steamed up and the house was "alive" with jokes, laughter and love... and we were all together...


Today I cooked fagioli, Italian bean soup which, in my part of Italy we eat with pasta or served next to "Cime di Rapa" (a vegetable very similar to broccoli but quite bitter in taste. If you can't get hold of this vegetable, Calabrese will do. I had to Calabrese, and I cooked both dishes, to show you!)
I made this from scratch, as my mamma taught me, by soaking 400g ( just over 1lb) of dried haricot beans, overnight. My mother would often make cavatelli ( a type of handmade pasta) to go with pulses. Fresh pasta changed the texture and flavour of the dish quite dramatically and the fact that mamma had made each cavatello for us, with love, certainly made it taste very, very special: "Con amore"... "With love!"


Pasta e Fagioli
Serves 7-8
Ingredients:
400g ( just under 1lb) dried haricot beans
2 cloves garlic
celery (as much as you like)
3-4 fresh cherry tomatoes
or 2 plum tomatoes
(tinned will do)
3-4 big glugs olive oil
salt
400g ( just under 1lb) cooked pasta
For the bacon and tomato sauce
to be later added to the cooked beans:
2 glugs olive oil
1 clove garlic, chopped
some pancetta, diced
or bacon
(can omit meat if you are making a
vegetarian version)
1 chilli pepper
(optional)
5 cherry tomatoes
salt
black pepper


My grandmother's very old terracotta pot.
I remember her cooking beans in it.
Beans cooked in terracotta taste delicious.


I soaked my beans overnight. This morning, I changed the water and covered my beans with more fresh water. You need a lot of water, as the beans will expand during cooking. Next, I added 4 cherry tomatoes, halved, three stick of celery, two garlic cloves and a generous portion of olive oil. I cooked my beans on a moderate heat for an hour and half (they have to be really soft, before you can eat them.)

All the ingredients went in the pan, in cold water

One thing I learnt from my mother is that you don't stir pulses with a metal spoon, as this will alter the temperature in the pan and stop the cooking process and, another thing: if your beans have soaked up all the liquid, you will need to add hot water, not cold!
LATER...
Once I knew my beans were ready, I made a very quick sauce, using garlic, pancetta (or bacon) cherry tomatoes, one smallish chilli pepper, salt and lots of black pepper, cooked in really hot olive oil, for ten minutes. I added this to my beans, at the end of cooking, for a really delicious and interesting taste.


Some like it hot!


Making the sauce

I cooked some  "casarecce" pasta, which has good texture and flavour, (use short pasta for this, like cavatelli or shells) drained the water and then added to my beans. I reserve some of your pasta water, in case the dish looked too dry.

My fagioli soup is looking very sexy!
I love casarecce


A big bowl of pasta e fagioli... you can
help yourself!

I also prepared a different version, using broccoli Calabrese, served next to some beans. I poured some fresh olive oil over this because... that's the traditional way to eat this... with crusty bread, of course. In Bari, you would use cime di rape ( broccoli di rape in Naples) instead of Calabrese.
This dish is easy and simple and an example of Mediterranean food at its best!
Buon appetito!


 Broccoli e fagioli

Tuesday, 14 June 2011

I made ricotta!

"If you squeeze half a lemon into a pan of warm milk, you'll make ricotta!" I still remember my mother telling me that and encouraging me to experiment with food. If only she had known that, when everyone was asleep, in the afternoon, I would climb onto the side of the bath, quietly open the medicine cabinet and, having got hold of my dad's heart tablets, I would undertake experiments of my own ( tablets, compost and soap, tablets and shaving foam... you name it, I mixed it!)
Anyway... after I squeezed a lemon into my warm milk, this would separate into curds and whey and the solid, but soft curds you could eat. I have to say that the stuff we bought from the shops was much nicer: soft, fluffy ricotta cheese!
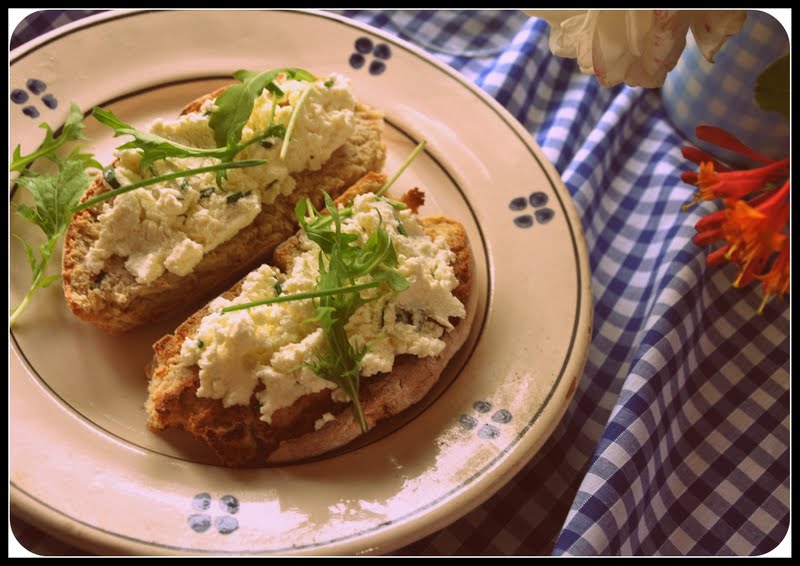
I made ricotta, today, and I am quite pleased with the end result. My ricotta looks quite good. It's not as creamy as I would have liked, but I'm sure that, mixed with chopped chives and a tablespoon of yogurt, it will make a delicious topping for my bruschetta, today. And who knows what else we can make!
Let's make ricotta! It's really easy and very quick to make. According to some recipes, you should use a thermometer, to check the milk temperature before removing from the heat, but... if like me you don't have one, all you do is you take the milk off the heat before it begins to bubble up and boil.
The recipe below makes about 150 g of ricotta. You can double the amounts if you like.
 
 
Ricotta Cheese
Recipe
Makes 150 g (5 oz)
Ingredients:
1 l (about 2 pt) whole milk
70 ml (2 1/2 fl oz) distilled or white wine vinegar
large pinch of salt
chopped chives
(optional)
cheesecloth
(double thickness)
Place your milk and  in a stainless steel pan, or a heavy non-reactive pan, on medium heat. Stir briefly, then allow the milk to heat up gently. After a few minutes, you will notice that a few tiny bubbles will begin  to appear on the surface. If you have a thermometer, check the milk temperature: 180 degrees is the temperature you are aiming for. If, like me, you don't have a thermometer ( surprise, surprise!) just watch your milk, because as soon as it looks as if it might begin to boil, you need to take the pan off the heat, add the vinegar and salt, then stir. Immediately the curd and the whey will separate. Magico!
You can leave the pan to stand for an hour or so. When the ricotta has rested for one or two hours, take your two sheets of cheesecloth, dampen them and place inside a colander.
Ladle out the ricotta into the prepared colander. Place the colander with your ricotta inside a larger pan so it can drain. I let mine drain for about one hour. By this time my cheese was looking like "real" ricotta! MIRACLE!  And tasted delicious! To make my ricotta creamy, I added two tablespoons of plain yogurt.
As you will see from the pictures, I mixed my cheese with chopped chives, which I spread on bruschetta and, just remembering something my mother used to make, I cooked some pasta shells, drained and served it blended with the rest of my ricotta and chives and Parmesan cheese. It was good and delicate.


 I added chives and plain yogurt

Pasta e ricotta

 
Bruschetta con ricotta e erba cipollina

Sunday, 12 June 2011

Granita al Limone ( Italian Lemon Ice- DELIZIOSO! )

And this... is the original recipe for Granita al Limone (Lemon Ice.) Again, like the previous one, I got this recipe from RAI TV, Italian Television, so... it must be good! Actually, I already had a taste: it's perfectly summery, refreshing and looks inviting!
It's a really easy recipe. You could make some white chocolate decoration for this, by melting the chocolate, adding a few pieces of lemon peel and then just drizzling on greaseproof paper to make abstract, delicious shapes.
I didn't! I decorated mine with rosemary, mint, thyme, lemon peel and just a little strawberry, fresh from my garden!


Granita


Granita al Limone
Lemon Ice
Ingredients
  ( 4-5  Servings)
570ml ( 1pt)  water
6 lemons
200g (7 oz) sugar
herbs and fruit ( or white chocolate)
to decorate

This is so easy! Before you start, you need to peel your lemons ( keep the peel, as you will need it, soon) squeeze the juice out of each one of them, collect and keep to one side. Next, put your water and sugar in pan and bring to the boil. Stir until the sugar has dissolved, then take off the heat and add all the lemon peel ( I reserved some for my decoration) and the juice.


Leave to infuse for half an hour. This will make your granita taste ever so lemony and summery! Next, you need to sieve this mixture and place it into a container suitable for freezing.


Once everything has cooled down, the final stage: The freezer! Place your strained lemon juice in the freezer, for about two hours. During this time, make sure that you stir frequently, so you get a delicious almost fluffy granita. Decorate with fruit or white chocolate and lemon peel. Mine was delicious. I know because I ate some!


Gelato al limone ( Fresh Lemon Juice Ice-Cream... buonissimo! )

"Summer wouldn't be Summer without ice-cream!" When I was growing up, in Italy, we would keep really big tubs of it in the freezer. My father had three loves in life: his wife and kids, rum baba` and ice cream! I remember finding him in the kitchen, one lazy Summer afternoon, eating ice cream from the tub. He looked like a naughty little kid, my poor babbo! He really loved ice-cream!
Did you know that Italians only eat ice cream in Winter? When we were in Italy, in April, my husband went to Caffe` Roma, as he so wanted to taste his favourite granita al limone (lemon sorbet) but was very disappointed when signora Maria told him that the machine was still switched off! Not warm enough yet!
So... I set myself a challenge: I will try to make lemon sorbet or ice cream which tastes better than Caffe` Roma's! I found a recipe for Lemon Ice-cream, and one obvious and easy one for Granita al limone (Lemon Ice) which I will show you later.
Here is how I made my lemon ice-cream:
Gelato al Limone
(Lemon Ice-Cream)

4-6 servings
Ingredients:
200g (7 oz) sugar
125 ml (4 1/2 fl oz) lemon juice
( about 7 large lemons)
125 ml (4 1/2 fl oz) milk
230 ml (8 fl oz) water
pinch of salt
2 egg whites
Fresh Fruit
Before you start, prepare all your ingredients. Squeeze the lemons, to obtain the right amount of juice. Next, place water, salt and most of the sugar  (160 g - about 5 1/2 oz) in a pan.
 Heat for about five minutes, or until the sugar has dissolved. Take off the heat and add lemon juice and milk. I was surprised at this stage, as I thought I was going to end up making ricotta, but no... the liquids really blended well!
This mixture needs to be frozen, once cool, for as long as it takes for it to become ice ( about three hours.) I kept stirring mine, as I wanted it to be soft. Anyway! When this mixture is frozen, whisk the egg whites in a separate bowl.


 Now begin to gradually add the rest of the sugar, until you get a lovely, soft meringue like texture ( this tastes so incredibly silky!)
Break up the icy mixture from the freezer, then fold in the "meringue" until you get something which is beginning to look like ice cream. This has to be frozen for a while longer before being consumed. Again, I kept stirring mine and the result was molto, molto buono... Very good: a cross between ice-cream and sorbet. Just lovely for a sunny afternoon, with the addition of blueberries and just a few little alpine strawberries from the garden!
I love the little strawberries!
 

Friday, 10 June 2011

A New Day Begins ( M'Illumino d'Immenso)


You could so easily forget who you are, when you can't see where the sea ends and the sky begins.

I went outside, one morning, opened the windows and I instantly knew why the poet (Eugenio Montale) had written one very short verse: " M'illumino d'immenso" ( "Immensity fills me with light") because that is just how I felt, that morning, like every morning, when I realized I couldn't see where the sea ended and the sky began and all I could feel was an overwhelming feeling of immensity.
 
Getting lost in the INFINITO didn't make me feel insignificant: on the contrary, I knew, for sure, I was part of some great scheme of things. I went inside, put the coffee on, opened the door and went back outside. On my left, a tiled roof, above it, our terrace and, in the corner, my very beautiful oleander I grow in a pot. Winters, in Cilento, can be very long, cold and severe and my beautiful ruby red oleander needs to be sheltered.
My fig trees and the ancient olive tree which live right outside our door seemed to frame the most beautiful of landscapes: the Gulf of Salerno, on my right, crowned by mountains covered in green, yellow and pink jewels, and, on my left, my washing, hanging in the windy, sunny "Welcome!" to a new day, and the island of Capri. Boats floated lazily on the turquoise sea and I felt happy.
I stood under the big fig tree and picked some wild fennel. My orange and lemon trees were still very tiny and surrounded by myriads of baby bay leaf seedlings... a gift from the wind, for sure. There was a scent in the air: the nicotiana, in the shade, was still open. I watered my basil and picked a leaf: wonderful! I knew it would be a good and very hot day... I just knew!
A bubbling sound from inside the house told me my coffee was ready... the familiar pungent smell had reached me and invited me to go inside for the first drink of the day. But the sun was getting hotter, the neighbours were beginning to get up ( I could hear their voices and steps) and I really wanted to stay right there, and be part of the "show."
 Like my beautiful flowers, I needed to soak up the sun, the wind, the blue, the infinite blue, there, where the sea ends and the sky begins. "M'illumino d'immenso" ... said the poet: HOW TRUE!
The sun sets over the washing, drying on the terrace. How beautiful!

Sunday, 5 June 2011

Ciambelline di farina e patate (Italian Homemade doughnuts) Eccezionali!

As I walked through the streets of old Modugno, in the hot April sun, I could smell roses... the heat of the sun made the scent so sweet and deep, I couldn't help getting somehow lost in memories of a time when my mother would take me out, to the countryside, to make sure I grew up appreciating all the beautiful things that you just didn't see in  the city. 


We love walking round the streets of historic Modugno!

And I remembered a villa, just beyond the Bari Nord station crossing. Where now stand tall buildings, when I was a little girl, was countryside. And that villa was covered with so many roses, you couldn't see the bricks!


We picked bunches of multicoloured roses,  had a cold drink with my mum's friend "La signora delle rose" and went back to our city life. On our way Mamma showed me artichokes, growing in fields and lemons, growing on trees. And I thought they just came in boxes, from somewhere out of space!
Anyway! Off the Tardis... Grown up me went back to my sister's  house. Standing on her terrazza, in Modugno, you could reach the neighbour's huge lemon tree, so big you could easily get lost, looking down, into the foliage.


On the rooftop. A beautiful chimney!

My sister picked one of those lemons and used it to make "ciambelline", doughnut rings, made using, amongst the other ingredients, the zest of a lemon!
Today, I made my own ciambelline, using her recipe. I also made crystallized rose petals. Now... these are only edible if the petals you use were not sprayed with any kind of chemical... mine are totally organic, so I used them.
Well... here is the recipe. If I can make ciambelline, so can you! But... guess what? I left the last two in the pan and... they burnt!

Ciambelline con patate

Makes 25
Ingredients
1/2 kg (1 lb 1oz) plain (00-all purpose) flour
1/2 (1 lb 1oz) kg potatoes, boiled and mashed
30 g  (1 oz and a bit!) live (fresh) yeast
large pinch salt
zest of one lemon
1 egg
Oil for frying
Sugar

I boiled my potatoes in a pan of hot water. I didn't peel them, as I didn't want them to disintegrate or become watery. Once cooked, I peeled and mashed the potatoes. They looked lovely and dry.


Having placed my flour in a mixing bowl, I added the mashed potatoes, the egg, a generous pinch of salt, the zest of one beautiful lemon and the yeast. ( if you can't buy live yeast, any bakery, supermarket or pizza place will let you have some!) As I mixed the ingredients together (I did this by hand, but you don't have to) I added some warm water ( I used about 1/2 cup, but the amount can vary.)
You should get a soft dough. If it's too soft, you can add more flour. At this stage you can start making your "rings" by using small pieces of dough (about the size of a golf ball) rolled out in the shape of a sausage and then joint, as you can see in the picture.


I placed all my lovely little rings onto a clean cloth, covered them and left them for a good 20-25 minutes ( I actually forgot and left mine to "rest" for longer than that. ) By this time they would have increased in size.


I don't usually fry things, so I don't own a deep fat fryer... just a pan which is redundant most of the time. Anyway! I heated some oil and when really, really HOT, I started frying my ciambelle. I gave them about two minutes per side and made sure they were cooked inside. I could smell the yeast all over my kitchen (as a child I used to eat live yeast, then, as I grew up, I started mixing it with water to make a face mask! Funny!)


I placed my little cakes onto kitchen paper, then in my very beautiful glazed Wedgwood dish and decorated with crystallized rose petals!


I will just eat these with my eyes (it's true!)


A very generous sprinkling of caster sugar made my ciambelline sweet and delicious! I love the rose petals!